Introduction
If you are looking for a fun, easy dessert that kids absolutely love, this no bake dirt pudding cake is perfect for you.
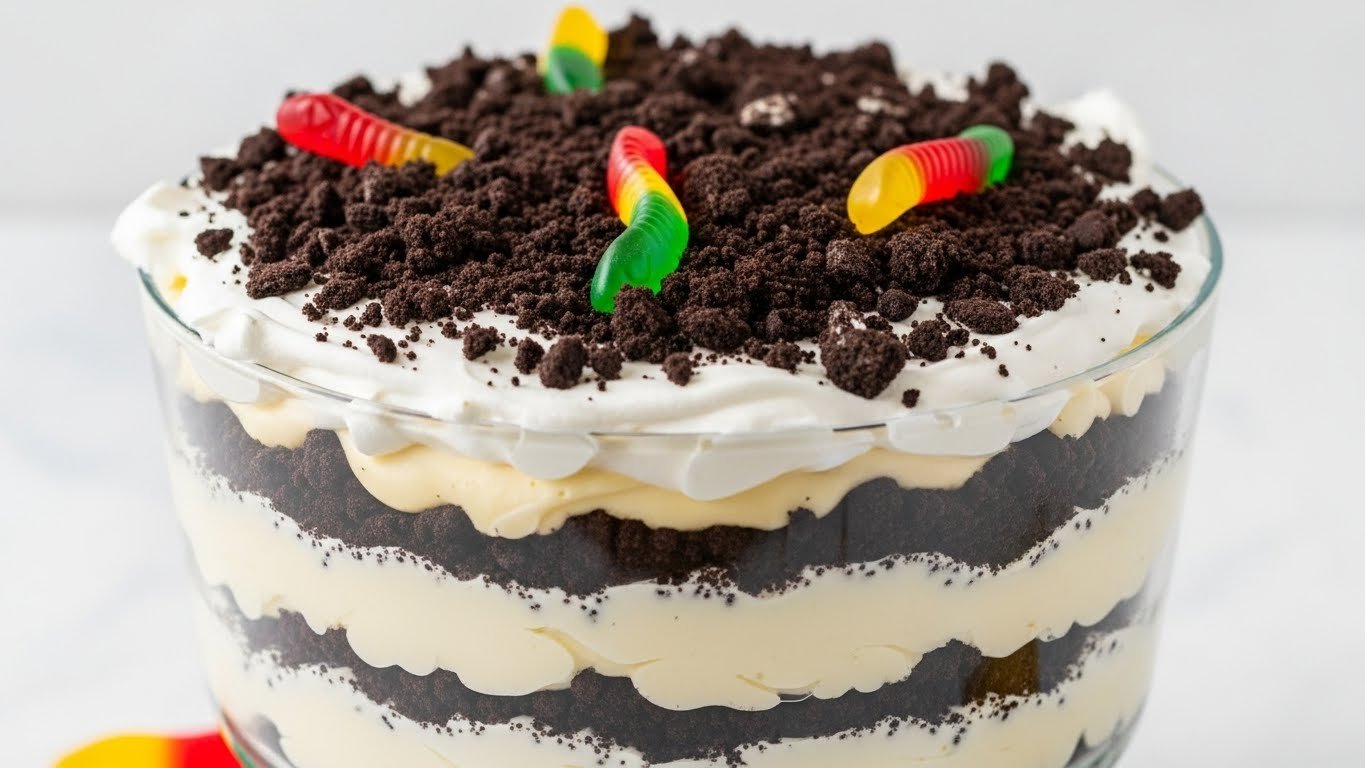
Think about it: layers of creamy chocolate pudding, fluffy whipped topping, and crushed chocolate sandwich cookies that look just like “dirt.” On top, colorful gummy worms are peeking out of the crumbs. It is silly, cute, and completely delicious.
This dirt pudding cake is:
- No bake
- Easy enough for kids to help
- Great for birthday parties, school events, and sleepovers
- A big crowd-pleaser for both children and adults
Because it uses store-bought pudding, cookies, and whipped topping, you do not need to be a skilled baker to make it. You just mix, chill, and layer. That’s it.
In this easy, step-by-step guide, we’ll walk through:
- A little background on dirt cake
- The best ingredients to use
- How to make the pudding layer smooth and creamy
- How to assemble and decorate your dirt pudding cake so it looks fun and party-ready
Let’s get started and make a dessert that will make the kids squeal with excitement.
History / Background
Dirt pudding cake, sometimes called “dirt cake” or “dirt dessert,” is a fun American no-bake dessert that became very popular in the 1980s and 1990s.
It is really a playful twist on a classic layered pudding dessert:
- Crushed chocolate sandwich cookies (like Oreos) become “dirt.”
- Creamy pudding and whipped topping are mixed with cream cheese and sugar to make a light, mousse-like filling.
- The whole thing is often served in a dish that looks like a flower pot or a garden.
Parents and home cooks started making this dessert for children’s birthdays and parties because:
- It’s inexpensive.
- It doesn’t require an oven.
- Kids can help with many steps.
- The final dessert is funny and cute, especially with gummy worms or candy bugs.
Over time, dirt pudding cake has taken on many shapes:
- In a 9×13 pan like a cake
- In clear cups for individual servings
- In plastic flower pots with fake flowers
- As Halloween “graveyard” dirt cake with cookie tombstones
Our version keeps everything simple and party-ready. It’s made in a 9×13 pan so you can easily cut slices or scoop it into bowls. It keeps all the nostalgic flavors: cookies, pudding, cream cheese, and gummy worms.
Why You’ll Love This Recipe
• No baking required – Great for hot days or when you don’t want to turn on the oven.
• Kid-approved and kid-friendly – Children love the look and taste. They can help crush cookies, mix pudding, and decorate.
• Easy to make ahead – Perfect for busy party days; you can prepare it a day in advance.
• Super creamy and delicious – The pudding, cream cheese, and whipped topping make a smooth, fluffy filling.
• Fun to decorate – Add gummy worms, candy rocks, flowers, or themed decorations for any party.
• Feeds a crowd – A 9×13 pan serves plenty of kids at a birthday or school party.
• Flexible ingredients – Use different pudding flavors, different cookies, or your favorite candies.
• Beginner-friendly – Simple steps, no special skills needed.
• Nostalgic for adults – Many grown-ups remember dirt pudding cake from their own childhood.
• Easy to transport – Make it in a baking dish with a lid and take it to parties or potlucks.
Ingredient Notes
Let’s go through each main ingredient so you know exactly what to buy and why it’s there.
Chocolate Sandwich Cookies
These form the “dirt” in your dirt pudding cake.
- Use any brand of chocolate sandwich cookies (like Oreos).
- Regular cream-filled cookies are best. Double-stuffed also work but will be a bit sweeter and softer.
- You’ll crush them into crumbs, so no need for fancy or expensive cookies.
You can decide how fine or chunky you want your crumbs. Finer crumbs look more like soil; slightly bigger chunks add more crunch.
Instant Pudding Mix
Instant pudding makes the filling thick and creamy.
- Use instant pudding mix, not cook-and-serve.
- Classic flavors for dirt cake are:
- Chocolate
- Chocolate fudge
- French vanilla (for a lighter color)
In this recipe, we’ll use chocolate pudding for a rich, kid-friendly flavor.
Milk
You’ll need cold milk to mix with the instant pudding.
- Use cold milk so the pudding sets properly.
- Whole milk or 2% milk works best for a rich, thick pudding.
- Plant-based milk sometimes does not thicken instant pudding well, so use regular dairy milk for best results.
Cream Cheese
Cream cheese makes the filling extra creamy and gives a slight cheesecake-like taste.
- Use full-fat cream cheese, softened to room temperature so it blends smoothly.
- If it is too cold, it can become lumpy when mixed with sugar.
Powdered Sugar
Powdered sugar (also called confectioners’ sugar or icing sugar):
- Sweetens the cream cheese mixture.
- Blends easily and stays smooth.
Whipped Topping
Whipped topping (like Cool Whip) makes the filling light, fluffy, and easy to spread.
- Use frozen whipped topping, thawed in the fridge before using.
- You can use homemade whipped cream instead, but store-bought whipped topping holds its shape better over time.
Vanilla Extract
Vanilla extract adds a nice warm flavor to the filling and makes it taste more homemade.
Gummy Worms (or Other Candy)
For decoration:
- Gummy worms are classic for dirt cake.
- You can also use:
- Candy bugs
- Candy rocks
- Chocolate sprinkles
These are optional but highly recommended for kids’ parties.
Equipment Needed
You don’t need any special baking tools for this no bake dirt pudding cake, just some simple kitchen items.
Essential Equipment
- 9×13 inch baking dish – Glass or metal; this will be your “cake pan.”
- Mixing bowls – One large for the pudding mixture, one medium for the cream cheese.
- Electric hand mixer – Helpful for beating cream cheese and whipping everything together smoothly.
- Measuring cups and spoons – For accuracy.
- Rubber spatula – To fold the whipped topping and scrape the bowls.
- Whisk – For mixing the pudding with milk.
- Food processor or zip-top bag + rolling pin – To crush the cookies.
Nice-to-Have Equipment
- Offset spatula – For spreading the layers evenly.
- Plastic wrap or lid for the dish – To cover while chilling or storing.
- Serving spoon or small spatula – For dishing out portions at the party.
Full Recipe Card (Ingredients, Instructions, Notes)
Fun No Bake Dirt Pudding Cake – Easy Recipe for Kids Parties
Servings: About 12–16
Prep Time: 25–30 minutes
Chill Time: At least 2 hours
Total Time: About 2½–3 hours (mostly chilling)
Difficulty: Easy
Ingredients
For the “dirt” layer:
- 1 regular package (about 14–15 oz / 400–430 g) chocolate sandwich cookies (like Oreos)
For the pudding cream layer:
- 2 boxes (3.4 oz / 96 g each) instant chocolate pudding mix
- 3 cups (720 ml) cold milk
- 8 oz (225 g) cream cheese, softened to room temperature
- 1 cup (120 g) powdered sugar
- 1 teaspoon vanilla extract
- 1 tub (8–12 oz / 225–340 g) frozen whipped topping, thawed (Cool Whip or similar)
For decoration:
- Gummy worms
- Extra crushed cookies or candy rocks (optional)
Instructions
1. Crush the cookies
- Place all the chocolate sandwich cookies into a food processor and pulse until you have crumbs.
- If you prefer, place the cookies in a large zip-top bag, seal it well, and crush them with a rolling pin or heavy pan until they become crumbs.
- Set the cookie crumbs aside.
2. Make the pudding
- In a large mixing bowl, pour in the instant chocolate pudding mix.
- Add the cold milk.
- Whisk for 2 minutes until the pudding starts to thicken and is smooth.
- Set the pudding aside for a few minutes to finish thickening while you prepare the cream cheese mixture.
3. Mix the cream cheese layer
- In another medium bowl, add the softened cream cheese and powdered sugar.
- Beat with an electric mixer on medium speed until smooth and creamy, with no lumps. Scrape down the sides of the bowl if needed.
- Add the vanilla extract and mix again briefly.
4. Combine pudding and cream cheese
- Add the thickened pudding into the cream cheese mixture.
- Beat on low speed or whisk gently until fully combined and smooth.
5. Fold in the whipped topping
- Gently fold the thawed whipped topping into the pudding mixture using a spatula.
- Fold slowly and carefully to keep the mixture light and fluffy.
- Stop when you no longer see white streaks.
This is your creamy dirt pudding filling.
6. Layer the dirt cake
- Sprinkle about one-third of the crushed cookies into the bottom of your 9×13 baking dish. Spread into an even layer. This is your first “dirt” layer.
- Spoon half of the pudding-cream mixture over the cookie crumbs. Spread gently with a spatula to make it smooth.
- Sprinkle another one-third of the crushed cookies evenly over the pudding layer.
- Add the rest of the pudding mixture on top and spread it out evenly.
- Finish with the remaining one-third of the cookie crumbs on top, covering the pudding completely. This is your top “soil” layer.
7. Chill
- Cover the dish with plastic wrap or a lid.
- Refrigerate for at least 2 hours, or until the dessert is set and nicely chilled.
- For best results and firm slices, chill 4 hours or overnight.
8. Decorate and serve
- Just before serving, decorate the top with gummy worms, candy rocks, or any fun candies you like.
- Gently press the gummy worms into the crumbs so they look like they are crawling out of the “dirt.”
- Scoop into bowls or cut into squares to serve.
Kids will love digging into this fun dirt pudding cake!
Recipe Notes
- If you like more “dirt,” you can use extra cookies for a thicker top and bottom layer.
- For a lighter flavor, you can use one box chocolate pudding and one box vanilla pudding.
- You can reduce the powdered sugar slightly if you prefer a less sweet dessert.
- This dessert tastes even better the next day after chilling overnight.
Tips & Variations
This no bake dirt pudding cake is very flexible. Here are some ideas to change it up for different parties or tastes.
Fun Theme Variations
- Flower Pot Dirt Cake:
Layer the dessert in clean plastic flower pots or clear cups. Top with a fake flower “planted” in the dirt (wrap the stem in plastic before putting it in). - Graveyard Dirt Dessert (Halloween):
Add cookie tombstones (write names with melted chocolate or icing), candy bones, and gummy worms. Use a little green-tinted coconut for “grass.” - Bug Garden Cake:
Use gummy bugs, butterflies, and candy rocks on top for a garden theme party.
Flavor Variations
- Cookies and Cream Dirt Cake:
Use vanilla pudding instead of chocolate. Add extra chopped cookies into the pudding layer. - Peanut Butter Dirt Cake (check for allergies):
Beat ½ cup peanut butter into the cream cheese mixture before adding pudding. Use chocolate and peanut butter candies on top. - Chocolate Lover’s Dirt Cake:
Use chocolate fudge or dark chocolate pudding and add mini chocolate chips between layers.
Healthier Swaps (a little lighter, still fun)
- Use low-fat cream cheese and light whipped topping.
- Use reduced-fat chocolate sandwich cookies.
- Serve smaller portions in individual cups.
Different Shapes and Sizes
- Individual Dirt Cups:
Layer cookie crumbs and pudding mixture in small clear cups. Perfect for portion control and easy serving at kids’ parties. - Smaller Batch:
Halve the recipe and use an 8×8 inch dish for a smaller family dessert.
Pro Chef Tips
Even though this is a simple, kid-friendly recipe, a few small tips can help you get the best results:
- Make sure the cream cheese is soft
Take the cream cheese out of the fridge 30–45 minutes before you start. Soft cream cheese blends smoothly and won’t leave little lumps. - Use very cold milk for the pudding
Cold milk helps the instant pudding set quickly and firmly. Warm milk can make the pudding too runny. - Don’t overmix the whipped topping
Fold it in gently until just combined. Overmixing can deflate it and make the dessert less fluffy. - Crush cookies to your liking
For a more realistic “dirt” look, crush the cookies into fine crumbs. For more crunch, leave a few small chunks. - Chill long enough
Give the dessert plenty of time in the fridge. At least 2 hours is needed, but 4 hours or overnight will give the best structure and flavor. - Decorate just before serving
Add gummy worms and candies right before serving so they stay fresh and don’t get too sticky or soft. - Use a clear dish for presentation
If you have a glass 9×13 dish or a trifle bowl, it’s fun to see the layers from the side.
Common Mistakes to Avoid
Even an easy dessert can have a few little problems. Here’s how to avoid them:
1. Runny Pudding Layer
Problem: The filling doesn’t set and is too liquid.
Causes:
- Using the wrong pudding (cook-and-serve instead of instant)
- Using too much milk
- Not chilling long enough
Avoid it by:
- Using instant pudding mix only.
- Measuring milk carefully.
- Letting it chill at least 2 hours, more if you can.
2. Lumpy Cream Cheese Mixture
Problem: Little white lumps of cream cheese in the filling.
Causes:
- Cream cheese too cold
- Not beating cream cheese and sugar until smooth before adding pudding
Avoid it by:
- Letting cream cheese soften at room temperature.
- Beating cream cheese and powdered sugar alone until completely smooth before adding pudding.
3. Soggy or Too Soft Cookie Layers
Problem: Cookies lose all crunch and become very mushy.
Reality: Some softening is normal and delicious. But if it seems too mushy:
Causes:
- Too thin cookie layers
- Dessert sitting too long at room temperature
Avoid it by:
- Using enough cookie crumbs for a full bottom and top layer.
- Keeping the dessert chilled until serving.
4. Dessert Too Sweet
Problem: Very sweet for your taste.
Causes:
- Using very sweet cookies and full sugar amounts in filling
- Using sweet candies on top
Avoid it by:
- Reducing powdered sugar in the cream cheese mixture slightly.
- Using unsweetened or less sweet toppings (fewer candies).
Storage & Meal Prep
One of the best parts of this dirt pudding cake is how well it keeps.
Storing Leftovers
- Cover the dish tightly with plastic wrap or a lid.
- Store in the refrigerator for up to 3–4 days.
- The cookie layers will soften more each day, but the flavor stays great.
Meal Prep Ideas
- Make the whole dessert the day before a party.
- Keep it chilled until it’s time to serve.
- Add gummy worms and decorations right before serving so they stay fresh and pretty.
Make-Ahead & Freezer Notes
Make-Ahead
This dessert is excellent for making ahead:
- Make and assemble completely, except for the gummy worms.
- Cover and refrigerate for up to 24 hours before serving.
- Decorate with candies right before bringing it out.
Freezing
Freezing is not ideal for this dessert:
- The texture of the pudding and whipped topping can change after freezing and thawing.
- The cookies may become too soft.
If you really need to freeze it:
- Freeze tightly wrapped for up to 1 month.
- Thaw in the refrigerator overnight.
- Expect a softer texture than the fresh version.
For the best taste and texture, this dirt pudding cake is best enjoyed fresh or within a few days from the fridge.
Serving Suggestions
Here are some ideas to serve your fun no bake dirt pudding cake at kids’ parties:
Party Serving Ideas
- Scoop portions into small paper cups or bowls.
- Let kids add their own gummy worms or candies on top from a little “topping station.”
- Serve with small spoons and napkins; it can get a bit messy (in a fun way!).
Presentation Ideas
- Add a birthday candle or sparkler in the center for a special birthday moment.
- Decorate with the birthday child’s favorite candy animals or characters.
- Write a message (“Happy Birthday!”) on top with colored icing or candy letters.
Pairing Ideas
- Serve with milk, chocolate milk, or juice boxes for kids.
- For adults, offer coffee or tea alongside the dessert.
FAQs
Q: Can kids help make this recipe?
A: Yes! Kids can crush cookies, help whisk the pudding, fold in the whipped topping, and decorate with gummy worms. An adult should handle the electric mixer and any sharp tools.
Q: Can I use homemade whipped cream instead of whipped topping?
A: Yes, you can. Whip 2 cups of heavy cream with a few tablespoons of powdered sugar until soft peaks form. Fold it in just like you would the whipped topping. Keep in mind that homemade whipped cream may soften more quickly than store-bought topping.
Q: Can I make this dirt cake gluten-free?
A: Yes. Use gluten-free chocolate sandwich cookies and make sure your pudding mix is gluten-free. The rest of the ingredients are usually gluten-free, but always check labels.
Q: Can I use sugar-free pudding and light whipped topping?
A: Yes, you can use sugar-free or “light” versions if you prefer. The taste and texture may change slightly, but it should still work.
Q: What if I don’t like cream cheese?
A: You can leave out the cream cheese and powdered sugar and simply mix pudding with whipped topping. It will be lighter and less rich, more like a simple pudding dessert.
Q: How far in advance can I make this dessert?
A: You can make it up to 24 hours in advance. Keep it covered and chilled. Decorate with gummy worms and candies just before serving.
Q: Can I use vanilla pudding instead of chocolate?
A: Yes. Vanilla or French vanilla pudding makes a lighter-colored dirt cake. You can also do one box of vanilla and one box of chocolate for a mix.
Q: Why is my pudding layer not firm enough?
A: Make sure you used instant pudding, the correct amount of milk, and gave it enough chilling time. Also check the expiration date on the pudding mix.
Conclusion (friendly and encouraging)
You now have a complete, easy guide to making a fun no bake dirt pudding cake that’s perfect for kids’ parties, birthdays, school events, or any day when you want a playful treat.
This recipe is simple, forgiving, and full of kid-friendly flavors: chocolate, cookies, cream, and candy. The best part is that you don’t need to turn on your oven, and you can invite the kids into the kitchen to help. They’ll love crushing the cookies, stirring the pudding, and decorating with gummy worms.
Don’t worry if it doesn’t look “perfect.” Dirt cake is supposed to be a little messy and silly. Once everyone digs into those creamy layers and crunchy “dirt,” they will only care about how good it tastes.
So next time you need an easy dessert that makes children smile and adults nostalgic, remember this recipe. Grab some cookies, pudding, and gummy worms, and let your imagination (and your inner child) have fun.