Introduction
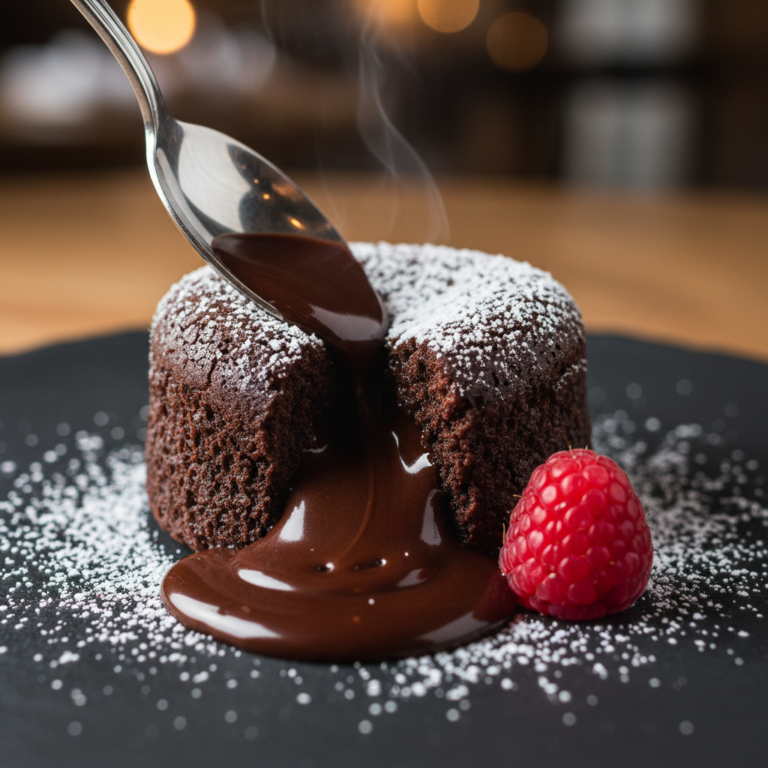
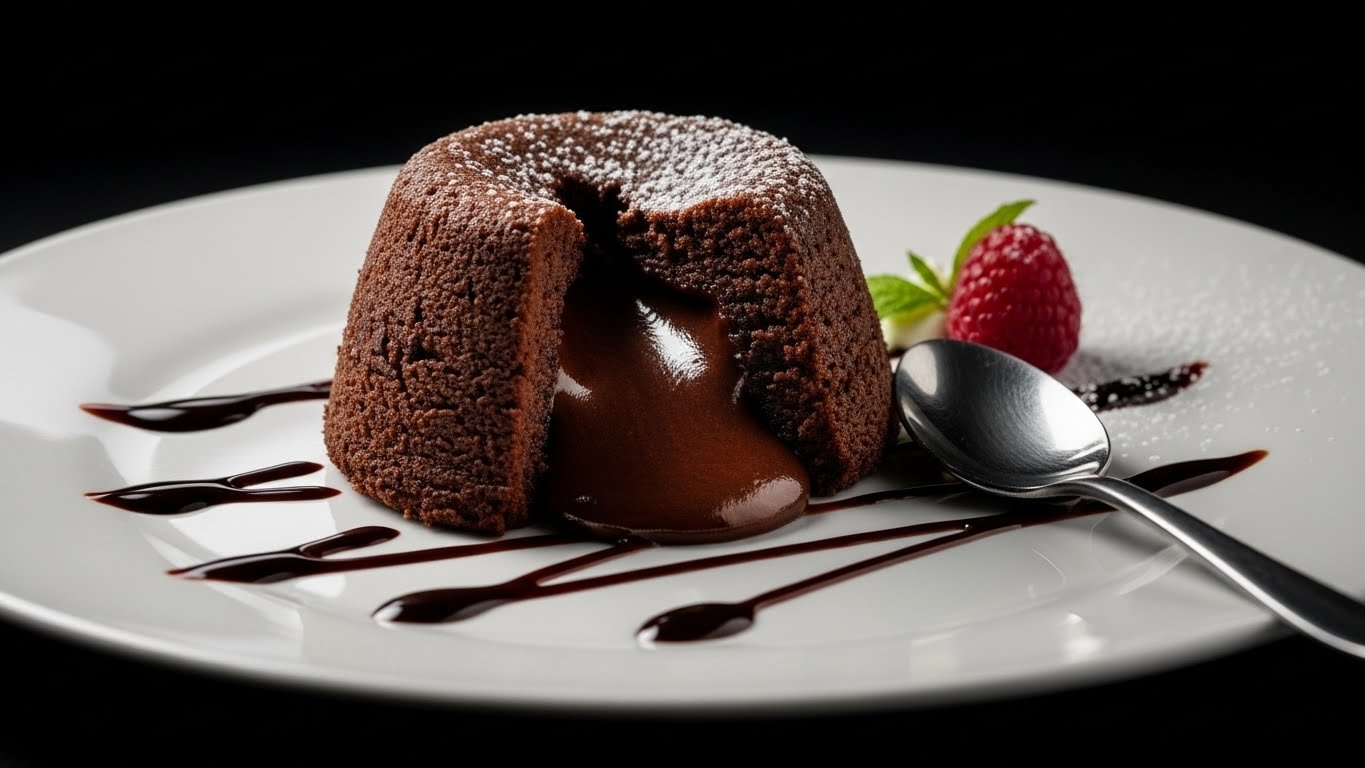
Have you ever wondered how restaurants create that perfect chocolate lava cake with a gooey, flowing center? You know the one I’m talking about – where you break through the slightly crispy exterior with your spoon and a river of warm, melted chocolate pours out onto your plate. It’s absolutely magical, right?
Well, I have amazing news for you! That impressive dessert you’ve been ordering at fancy restaurants is actually incredibly easy to make at home, and I’m about to share all the secrets with you. This recipe takes just 30 minutes from start to finish, and I promise you, it’s much simpler than you think.
For years, I was intimidated by lava cakes. I thought they required some complicated French pastry technique or special equipment. But once I learned the trick (spoiler alert: it’s all about timing!), I realized that these show-stopping desserts are actually perfect for home cooks. The best part? You probably have most of the ingredients sitting in your pantry right now.
Whether you’re planning a romantic dinner, hosting friends, celebrating a special occasion, or just really craving something chocolatey and indulgent, this recipe is about to become your secret weapon. Let’s dive in and learn how to make the most impressive dessert you’ll ever serve!
History / Background
The chocolate lava cake has a fascinating story that’s debated among chefs to this day. While French chef Michel Bras claims he invented his version called “coulant” in 1981, the dessert became famous in America thanks to chef Jean-Georges Vongerichten. According to legend, Vongerichten accidentally pulled a chocolate sponge cake out of the oven too early in 1987. When he cut into it and saw that molten center, he knew he’d discovered something special.
The dessert exploded in popularity during the 1990s and early 2000s. Soon, chocolate lava cake appeared on menus everywhere – from high-end restaurants to casual dining chains. It became the ultimate special occasion dessert, perfect for anniversaries, Valentine’s Day, and celebrations.
What makes this dessert so special is the combination of textures. You get a slightly firm, cake-like exterior that gives way to a warm, flowing chocolate center. It’s rich without being too heavy, and the presentation is absolutely stunning. When that chocolate flows out onto the plate, everyone at the table stops and stares. It’s dessert theater at its finest!
Even today, decades after its creation, chocolate lava cake remains one of the most popular restaurant desserts. And now you can bring that restaurant magic into your own kitchen.
Why You’ll Love This Recipe
- Super quick – Ready in just 30 minutes, perfect when you need dessert fast
- Looks impressive – Your guests will think you’re a professional pastry chef
- Simple ingredients – No fancy items required, just chocolate, butter, eggs, and sugar
- Perfect every time – My foolproof method ensures that molten center works every single time
- Beginner-friendly – If you can whisk and use an oven, you can make these
- Great for entertaining – Make the batter ahead and bake when ready to serve
- Portion control – Individual servings mean no messy slicing
- Customizable – Easy to add your own flavor twists
- Restaurant quality – Tastes just like what you’d pay $12-15 for at a nice restaurant
- Rich but balanced – Intensely chocolatey without being overly sweet
- Wow factor guaranteed – That flowing chocolate center never fails to impress
- Budget-friendly – Costs just a few dollars to make at home
Ingredient Notes
Dark chocolate (6 oz) – This is your star ingredient, so choose wisely! I recommend chocolate with 60-70% cocoa content. Good brands include Ghirardelli, Lindt, or Trader Joe’s dark chocolate bars. Don’t use chocolate chips – they have stabilizers that prevent smooth melting. Chop a chocolate bar instead. The quality of your chocolate directly affects the final taste, so use the best you can afford.
Unsalted butter (1/2 cup) – Real butter is essential here. It adds richness and creates that silky texture in the center. Unsalted is best because it lets you control the salt level. Don’t substitute with margarine or oil – it won’t work the same way. Let your butter soften slightly at room temperature for easier mixing.
Eggs (2 whole + 2 yolks) – Room temperature eggs work best because they mix more smoothly into the batter. The extra egg yolks are the secret to that creamy, flowing center! Whole eggs provide structure, while yolks add richness and help keep the center molten.
Granulated sugar (1/4 cup) – Regular white sugar dissolves easily and doesn’t interfere with the chocolate flavor. This recipe isn’t overly sweet, which lets the chocolate shine. If you prefer sweeter desserts, you can add an extra tablespoon.
All-purpose flour (2 tablespoons) – Just a tiny amount to give the cakes slight structure. Too much flour and they’ll be cakey instead of molten. Don’t overmix once you add the flour, or the cakes might become tough.
Vanilla extract (1/4 teaspoon) – Pure vanilla enhances the chocolate flavor beautifully. It’s a small amount, but it makes a difference you can taste.
Salt (pinch) – Just a tiny bit to balance the sweetness and make the chocolate flavor pop. Salt is the secret ingredient that makes chocolate taste even more chocolatey!
Cocoa powder (for dusting) – Unsweetened cocoa powder helps the cakes release easily from the ramekins and looks pretty too. You’ll use this to coat the insides of your ramekins along with butter.
Optional add-ins – Instant espresso powder deepens the chocolate flavor, orange zest adds brightness, or a splash of liqueur like Grand Marnier or Kahlua makes it extra fancy.
Equipment Needed
Ramekins (4-6) – These are small, individual ceramic baking dishes, usually about 6 ounces each. They’re perfect for individual lava cakes. You can find them at kitchen stores, Target, or Amazon. If you don’t have ramekins, you can use a muffin tin, but the presentation won’t be as nice.
Mixing bowl – A medium-sized bowl for combining ingredients. A heatproof bowl is ideal since you’ll be melting chocolate in it.
Whisk – For mixing everything together. A regular hand whisk works perfectly fine. You can also use an electric mixer if you prefer.
Microwave or double boiler – To melt your chocolate and butter. I usually use the microwave because it’s faster and easier, but a double boiler gives you more control.
Measuring cups and spoons – Baking needs accurate measurements, so these are important for consistent results.
Baking sheet – To place your ramekins on. This makes it easier to move them in and out of the oven safely.
Pastry brush – For buttering the ramekins evenly. You can also use your fingers, but a brush works better.
Small sifter or strainer – For dusting cocoa powder into the ramekins and powdered sugar on top at the end.
Rubber spatula – For scraping down the bowl and filling the ramekins neatly.
Kitchen timer – Timing is everything with lava cakes! Even 30 seconds can make a big difference.
Butter knife – For loosening the edges of the cakes before unmolding.
Full Recipe Card
30-Minute Decadent Chocolate Lava Cake
Prep Time: 15 minutes | Cook Time: 12-14 minutes | Total Time: 30 minutes | Servings: 4
Ingredients
For the cakes:
- 6 oz dark chocolate (60-70% cocoa), chopped
- 1/2 cup unsalted butter, plus extra for greasing
- 2 large eggs, room temperature
- 2 large egg yolks, room temperature
- 1/4 cup granulated sugar
- 2 tablespoons all-purpose flour
- 1/4 teaspoon vanilla extract
- Small pinch of salt
- 2 tablespoons cocoa powder (for dusting ramekins)
For serving:
- Vanilla ice cream
- Fresh berries (optional)
- Powdered sugar for dusting
- Whipped cream (optional)
Instructions
Step 1: Prep your ramekins and preheat oven
First things first – preheat your oven to 425°F (220°C). This high temperature is super important for getting that perfect molten center!
Now let’s prepare the ramekins. Take your butter and coat the inside of each ramekin generously. Use cold butter and really get into every corner and the rim. Then add a spoonful of cocoa powder to each one, tilt and rotate the ramekin so the cocoa coats all the buttered surfaces, and tap out any excess cocoa. This double coating ensures your cakes will slide right out. Place all your prepared ramekins on a baking sheet and set aside.
Step 2: Melt the chocolate and butter
Chop your chocolate into small, even pieces so it melts uniformly. Place the chopped chocolate and butter in a microwave-safe bowl. Microwave in 30-second bursts, stirring after each interval, until everything is completely melted and smooth. This usually takes about 90 seconds total.
If you prefer using a double boiler, place the chocolate and butter in a heatproof bowl set over a pot of barely simmering water. Stir occasionally until melted and smooth.
Once melted, set the mixture aside to cool for 3-4 minutes. You want it warm but not hot – if it’s too hot, it will cook the eggs when you add them.
Step 3: Mix eggs and sugar
While your chocolate cools, grab another bowl (or use the same one after melting if you only have one). Add the whole eggs, egg yolks, and sugar. Whisk vigorously for about 2-3 minutes until the mixture becomes pale yellow and slightly thick. It should fall from the whisk in ribbons. This step adds air and creates a lighter texture.
Step 4: Combine everything together
Pour your slightly cooled chocolate mixture into the egg mixture. Add the vanilla extract and pinch of salt. Whisk gently until smooth and glossy. The mixture should look silky and beautiful.
Now sift the flour over the chocolate mixture. Fold it in gently with a rubber spatula using a figure-eight motion. Mix just until you don’t see any white streaks of flour. Don’t overmix – a few tiny lumps are totally fine!
Step 5: Fill the ramekins
Divide your batter evenly among the prepared ramekins. I like to use a measuring cup or ladle for even distribution. Fill each ramekin about three-quarters full – don’t fill them to the very top or they might overflow.
At this point, you can refrigerate them for up to 24 hours if you’re making them ahead, which is perfect for dinner parties!
Step 6: Bake to perfection
Place your baking sheet with the ramekins into the preheated oven. Bake for 12-14 minutes. Here’s the key to success: the edges should look set and slightly pulled away from the sides of the ramekin, but the center should still look soft and jiggle slightly when you gently shake it.
For 6-ounce ramekins, 13 minutes is usually perfect. If your ramekins are smaller (4 ounces), check at 11 minutes. If they’re larger (8 ounces), you might need 15 minutes.
Step 7: The unmolding moment
Remove from the oven and let the cakes rest for exactly 1 minute. This is important – it lets them set just enough to unmold without falling apart.
Run a thin knife around the edge of each cake to loosen it. Place a dessert plate upside down over the top of each ramekin. Holding both together, quickly but carefully flip them over. Gently tap the bottom of the ramekin and slowly lift it off. Your beautiful lava cake should slide right out!
Step 8: Serve immediately
Dust with powdered sugar if you like, add a scoop of vanilla ice cream right on top, and serve while they’re still warm. Tell your guests to break into the center with their spoon and watch their faces light up when that chocolate flows out!
Recipe Notes
- Timing is critical: Set a timer and watch carefully. Even one extra minute can mean the difference between molten and fully cooked.
- Chocolate matters: Use good quality chocolate for the best flavor. This isn’t the time for cheap chocolate.
- Room temperature ingredients: Cold eggs won’t mix as smoothly. Let them sit out for 20-30 minutes before using.
- Don’t skip the cooling: Let the melted chocolate cool before adding eggs, or you’ll scramble them.
- Batter from fridge: If baking refrigerated batter, add 1-2 minutes to baking time.
- Test one first: If you’re nervous, make 5 cakes and test one before serving to get your timing perfect.
Tips & Variations
Perfect timing every time: The biggest secret to lava cake success is knowing when they’re done. Look for edges that have pulled slightly away from the sides and a center that still jiggles like jello when you gently shake the ramekin. When you lightly touch the top, it should feel set around the edges but soft in the middle. If you’re unsure, slightly underbaking is better than overbaking – you can always pop them back in for another minute.
Flavor variations: Add a teaspoon of instant espresso powder to the melted chocolate for mocha lava cakes. Stir in a tablespoon of peanut butter into the center of each cake before baking for a peanut butter surprise. Add 1/2 teaspoon of peppermint extract for a minty version. Orange zest makes them taste fancy and restaurant-quality.
Different sizes: Make mini lava cakes in a muffin tin and bake for only 7-8 minutes – perfect for parties! For one large lava cake, use an 8-inch round pan and increase baking time to 18-20 minutes.
Boozy additions: Replace 1 tablespoon of butter with your favorite liqueur. Chambord adds raspberry flavor, Grand Marnier adds orange, Kahlua adds coffee, or Bailey’s makes it extra creamy.
Spice it up: Add a pinch of cinnamon and cayenne pepper for Mexican hot chocolate lava cakes. A dash of cardamom creates a unique, exotic flavor.
Center surprises: Press a piece of caramel, a Rolo candy, or a square of your favorite chocolate bar into the center of each cake before baking for an extra surprise.
Make them fudgier: Reduce baking time by 1 minute for an even gooier center. Add an extra egg yolk to the batter for more richness.
Lighter version: Use 70% dark chocolate and reduce sugar to 3 tablespoons for a less sweet, more sophisticated flavor.
Pro Chef Tips
The butter coating secret: Professional bakers butter their ramekins in upward strokes from bottom to rim, not in circles. This creates tiny ridges that help the cake climb as it bakes, giving you taller, more impressive cakes. Use cold butter and really press it into the surface.
Temperature matters: After melting your chocolate and butter, let it cool to about body temperature (around 100-110°F). If it’s too hot, it scrambles the eggs. If it’s too cool, it won’t incorporate smoothly. Touch the outside of the bowl – it should feel warm but comfortable to touch.
The professional jiggle test: Gently shake the ramekin when you think it’s done. The outer ring (about 1 inch from the edge) should be completely firm and not move at all. The center circle should jiggle like set jello. If everything jiggles, bake longer. If nothing jiggles, you’ve slightly overbaked (but they’ll still be delicious!).
Even baking trick: If your oven has hot spots, rotate the baking sheet halfway through cooking. This ensures all cakes bake evenly so no one gets a disappointing one.
The unmolding secret: Wait exactly 60 seconds after removing from the oven before unmolding. Set a timer! Too soon and they’ll fall apart. Too late and they’ll stick. Also, running a knife around the edge helps tremendously.
Batter consistency check: Your finished batter should be thick enough to coat the back of a spoon but still flow smoothly. If it seems too thick, add a teaspoon of cream. If too thin, add another teaspoon of flour.
Professional plating: Warm your serving plates in a 150°F oven for a few minutes before plating. The warm plate keeps the chocolate flowing longer and prevents the cake from cooling too quickly.
The steam rule: Never open the oven door during the first 10 minutes of baking. The temperature drop can affect how the cakes set.
Common Mistakes to Avoid
Overbaking is mistake number one: This is the most common problem and the easiest way to ruin lava cakes. Remember, they continue cooking slightly after you remove them from the oven. If the center looks completely firm, you’ve gone too far. Always err on the side of slightly underdone rather than overdone.
Using chocolate chips: Please don’t use chocolate chips! They contain stabilizers to help them keep their shape, which prevents them from melting smoothly. Always use bar chocolate that you chop yourself. It makes a huge difference in texture.
Skimping on greasing: If you don’t butter and cocoa powder your ramekins thoroughly, your beautiful cakes will stick and break when you try to unmold them. Be generous and get into every corner, including the rim!
Hot chocolate meeting eggs: If your melted chocolate is too hot when you add the eggs, you’ll get scrambled egg bits in your batter. Always let the chocolate cool for a few minutes first. Touch the bowl – it should be warm, not hot.
Overmixing after adding flour: Once flour goes in, mix gently and just until combined. Overmixing develops gluten and makes your cakes tough instead of tender. A few tiny lumps are perfectly fine.
Filling ramekins unevenly: If one has more batter than another, they won’t bake at the same rate. Use a measuring cup or ice cream scoop to ensure even amounts in each ramekin.
Opening the oven repeatedly: Every time you open the oven door, the temperature drops. This messes with the baking time and can prevent proper rising. Use the oven light to check progress instead.
Waiting too long to serve: These are at their absolute best within 5 minutes of unmolding. After that, the center starts to cool and thicken. Have everything ready to go before you unmold.
Using cold ingredients: Cold eggs don’t mix smoothly and can cause the chocolate to seize. Always use room temperature eggs.
Wrong ramekin size: If you use different sized ramekins than called for, your timing will be off. A 4-ounce ramekin needs less time than an 8-ounce one.
Forgetting to preheat: Starting with a cold oven completely throws off the timing. The high initial heat is crucial for setting the edges while keeping the center liquid.
Storage & Meal Prep
Make-ahead batter: This is a game-changer for entertaining! Prepare the entire batter, pour it into your greased ramekins, cover each tightly with plastic wrap, and refrigerate for up to 24 hours. When ready to bake, take them out while the oven preheats (about 10 minutes) and add 2-3 extra minutes to the baking time since they’re starting cold. This means zero stress when you have guests!
Storing baked cakes: Honestly, lava cakes are best enjoyed fresh from the oven. But if you have leftovers, cover them in their ramekins with plastic wrap and refrigerate for up to 2 days. Reheat in the microwave for 30-45 seconds. The center won’t be quite as molten, but they’ll still be warm and fudgy.
Same-day prep: You can make the batter up to 2 hours ahead and leave it at room temperature in the covered ramekins. This is perfect if you’re making dinner and want dessert ready to go.
Chocolate mixture prep: You can melt the chocolate and butter mixture ahead of time and store it in the fridge for up to 3 days. When ready to use, gently warm it in the microwave until liquid again, then proceed with the recipe.
Reheating tips: The microwave works better than the oven for reheating. Heat for 20-30 seconds on high. The center won’t flow dramatically, but it will still be warm and gooey. Or reheat in a 350°F oven for 5-7 minutes.
Storage containers: Keep each cake in its ramekin rather than transferring to other containers. This maintains their shape and makes reheating easier.
Make-Ahead & Freezer Notes
Freezing unbaked cakes: This is my favorite make-ahead trick! Prepare the batter, pour into greased ramekins, wrap each tightly with plastic wrap, then place in a freezer bag. Freeze for up to 3 months. When ready to bake, don’t thaw – bake straight from frozen at 425°F for 18-20 minutes. Instant fancy dessert anytime!
Freezing just the batter: You can freeze the batter in a container for up to 2 months. Thaw overnight in the fridge, stir gently, pour into prepared ramekins, and bake as directed.
Batch cooking strategy: I love making triple batches and freezing individual portions. Whenever we want dessert, I just bake one or two from frozen. It’s like having a gourmet dessert stash ready to go!
Labeling for success: Write the date and baking instructions on the plastic wrap with permanent marker. Include “Bake frozen at 425°F for 18-20 minutes” so you don’t need to look up the recipe later.
Party planning timeline: For a dinner party, make the batter in the morning and refrigerate. Take out while serving the main course, and pop in the oven 15 minutes before you’re ready for dessert. Perfect timing!
Freezing baked cakes: I don’t really recommend this as the texture suffers, but if you must, wrap tightly and freeze for up to 1 month. Thaw overnight in the fridge and microwave for 45-60 seconds to serve.
Week-ahead prep: Make the chocolate-butter mixture up to a week ahead and refrigerate. When ready to bake, warm it gently and proceed with adding the eggs.
Serving Suggestions
Classic vanilla ice cream: You really can’t beat cold vanilla ice cream melting into warm chocolate. It’s the traditional pairing for a reason! Place a scoop right on top or beside the cake.
Flavored whipped cream: Try coffee whipped cream (add instant espresso), orange whipped cream (add zest and Grand Marnier), or mascarpone whipped cream for extra richness.
Fresh berry pairing: Fresh raspberries are perfect – their tartness cuts through the rich chocolate beautifully. Strawberries, blackberries, or a mixed berry compote are also wonderful. The fruit adds freshness and color to your plate.
Caramel drizzle: A drizzle of salted caramel sauce adds another flavor dimension and looks gorgeous. You can buy good quality caramel or make your own.
Textured toppings: Sprinkle crushed toffee bits, toasted nuts, or cookie crumbs around the plate for extra texture and visual appeal.
Coffee pairing: Serve with a small cup of espresso or strong coffee. The bitter coffee complements the sweet chocolate perfectly. Very European and sophisticated!
Raspberry sauce: Make a quick raspberry coulis by blending fresh or frozen raspberries with a bit of sugar and lemon juice. Drizzle around the plate.
Breakfast idea: Yes, really! Leftover lava cake makes an indulgent breakfast with Greek yogurt and berries. The eggs provide protein!
Wine pairing: Port wine, late harvest Zinfandel, or dessert wine enhance the chocolate beautifully. For non-alcoholic options, try hot chocolate or chocolate tea.
Beautiful plating: Use white plates to make the dark chocolate pop. Dust with powdered sugar through a sieve. Add a small mint sprig for color. Arrange berries artfully around the plate.
Casual serving: For family dinners, bring the cakes to the table in their ramekins with a bowl of ice cream. Let everyone dig in – it’s fun and cozy!
Dessert bar: Create a lava cake bar with various toppings in bowls – different sauces, fruits, whipped cream, nuts, and sprinkles. Let guests customize their perfect dessert.
FAQs
Why didn’t my lava cake have a molten center?
The most common reason is overbaking. Every oven is different, so start checking at 11-12 minutes. Look for set edges with a jiggly center. Also, if your ramekins were larger or smaller than 6 ounces, the timing would be different. Next time, reduce the baking time by a minute or two.
Can I make these without special ramekins?
Yes! You can use a standard muffin tin for mini versions (bake 7-8 minutes) or small oven-safe coffee cups. Any similar-sized oven-safe container works as long as you butter and dust it well. The presentation might not be as fancy, but they’ll taste just as good.
Help! My cake is stuck in the ramekin!
This happens when the ramekin wasn’t greased well enough. Make sure to use plenty of butter and coat every surface, including the rim. The cocoa powder dusting helps too. Also, let the cakes rest for exactly 1 minute after baking before unmolding – this allows the edges to set slightly.
Can I use milk chocolate?
You can, but the result will be much sweeter and less sophisticated. If using milk chocolate, reduce the sugar to 2-3 tablespoons and bake for about 1 minute longer since milk chocolate has a lower melting point.
What if my ramekins are a different size?
No problem! For 4-ounce ramekins, bake 11-12 minutes. For 8-ounce ramekins, bake 14-15 minutes. Watch for those set edges and jiggly centers.
Can I make this gluten-free?
Absolutely! Replace the all-purpose flour with almond flour or a gluten-free flour blend. You might need slightly less (start with 1.5 tablespoons) since alternative flours can be denser.
My chocolate seized when melting. What happened?
Chocolate seizes when it touches water or gets too hot too quickly. Make sure your bowl is completely dry. If using a double boiler, don’t let water touch the bowl. If it seizes, whisk in a tablespoon of warm cream to smooth it out.
Can I bake these in an air fryer?
Yes! Preheat to 375°F and bake for 8-10 minutes. Every air fryer is different, so watch them closely.
How do I know when they’re perfectly done?
The edges should look completely set and pull away slightly from the sides. The center should jiggle when you gently shake the ramekin. Touch the top lightly – it should feel firm around the edges but soft in the very center.
Can I make one large cake instead of individual ones?
You can, but it’s much harder to get that perfect molten center. Use an 8-inch round pan and bake for 18-22 minutes. Individual cakes are more reliable.
Why both whole eggs and extra yolks?
The extra yolks add richness and help create that creamy, flowing center. Whole eggs provide structure. This combination is the secret to perfect texture!
What if I don’t have vanilla extract?
You can skip it or use a different extract like almond or orange. The cakes will still be delicious, though vanilla does enhance the chocolate flavor nicely.
Conclusion
You did it! You now know the secret to making restaurant-quality chocolate lava cakes in your own kitchen. I’m so excited for you to try this recipe and experience that magical moment when you cut into the cake and watch the chocolate flow out.
The best thing about this recipe is how surprisingly simple it is. Once you make it once or twice, you’ll have the timing down and it’ll become second nature. And the confidence boost you’ll get when your guests think you’re a professional pastry chef? Priceless!
Don’t be intimidated by the fancy reputation of lava cakes. As you’ve learned today, they’re actually beginner-friendly and forgiving. The make-ahead options mean you can prep when it’s convenient and bake fresh when you need them. Perfect for impressing dinner guests, celebrating special occasions, or simply treating yourself on a Tuesday night because you deserve something wonderful.
Remember, the key to success is good quality chocolate and watching the baking time carefully. Set that timer, look for those set edges with a jiggly center, and trust the process. Even if your first attempt isn’t absolutely perfect, it’ll still be delicious!
I encourage you to make this recipe your own. Try the different variations I’ve suggested, experiment with toppings and flavor additions, and find your perfect combination. Some of my favorite cooking memories come from playing with classic recipes and discovering new favorites.
So grab that chocolate, preheat your oven, and get ready to create some dessert magic. Whether you’re celebrating something special or just want to make an ordinary day extraordinary, this chocolate lava cake will do the trick. Your kitchen is about to smell absolutely amazing, and your taste buds are in for the treat of a lifetime.
Happy baking, and enjoy every single spoonful of that glorious, flowing chocolate! Don’t forget to take a photo of that molten center moment – you’re going to want to remember it. Now go make some magic happen!